Dockerのメモ
自宅サーバーに使用しているコンテナの設定などの備忘録
セルフホスティング万歳!!!!
Ubuntu Core+Snap版DockerとPhoton OS+Dockerで運用中
ホストOSの管理しなくていいの楽でいい
Caddy
設定ファイルの書き方がド簡単なWebサーバー。
LetsEncryptに標準で対応しておりプラグイン次第ではCloudflareとうまく会話していい感じに取りまとめてくれる。
さらにDDNSもできるので自宅の入り口に置いてSNIで振り分ける使い方をを行う。
docker-compose.yml
services:
  caddy:
    container_name: caddy
    image: junklabs/caddy-cloudflare-dynamicdns:alpine
    restart: always
    cap_add:
      - NET_ADMIN
    ports:
      - "80:80"
      - "443:443"
      - "443:443/udp"
    env_file:
      - cloudflare.env
    environment:
      - TZ=Asia/Tokyo
    volumes:
      - ./caddy/Caddyfile:/etc/caddy/Caddyfile
      - ./caddy/srv:/srv
      - ./caddy/data:/data
      - ./caddy/config:/config
    networks:
      default:
        aliases:
          - auth.example.net
./caddy/Caddyfile
リバースプロキシのforwardヘッダーなどはデフォルトで設定済みなので本当にこれだけで動くし、Websocketもデフォルトで通る。
毎回コピペするおまじないのようなものがほとんど無いのですんげー快適です!!!!!
- Caddyfile
# The Caddyfile is an easy way to configure your Caddy web server.
#
# Unless the file starts with a global options block, the first
# uncommented line is always the address of your site.
#
# To use your own domain name (with automatic HTTPS), first make
# sure your domain's A/AAAA DNS records are properly pointed to
# this machine's public IP, then replace ":80" below with your
# domain name.
{
	email   {$ACME_EMAIL}
	# ステージング用に変えてあるので本番ではコメントアウトする
	acme_ca https://acme-staging-v02.api.letsencrypt.org/directory
	# DDNS用の設定
	dynamic_dns {
		provider cloudflare {env.CLOUDFLARE_API_TOKEN}
		domains {
			example.net @
		}
		ip_source simple_http https://api64.ipify.org
		versions ipv4
		check_interval 24h
	}
}

# それぞれのホストはCloudflareでCnameを作っておく
*.example.net {
	tls {
		dns cloudflare {env.CLOUDFLARE_API_TOKEN}
		resolvers 1.1.1.1
	}

	@authelia host auth.example.net
	handle @authelia {
		reverse_proxy authelia:9091
	}

	@headscale host hs.example.net
	handle @headscale {
		reverse_proxy headscale:8080
	}

	@komga host komga.example.net
	handle @komga {
		reverse_proxy komga:25600
	}

	# Fallback for otherwise unhandled domains
	handle {
		abort
	}
}
コマンドメモ
Caddyfileのフォーマット修正
docker-compose exec caddy caddy fmt /etc/caddy/Caddyfile --overwrite
設定リロード
docker-compose exec caddy caddy reload --config /etc/caddy/Caddyfile --adapter caddyfile
Authelia
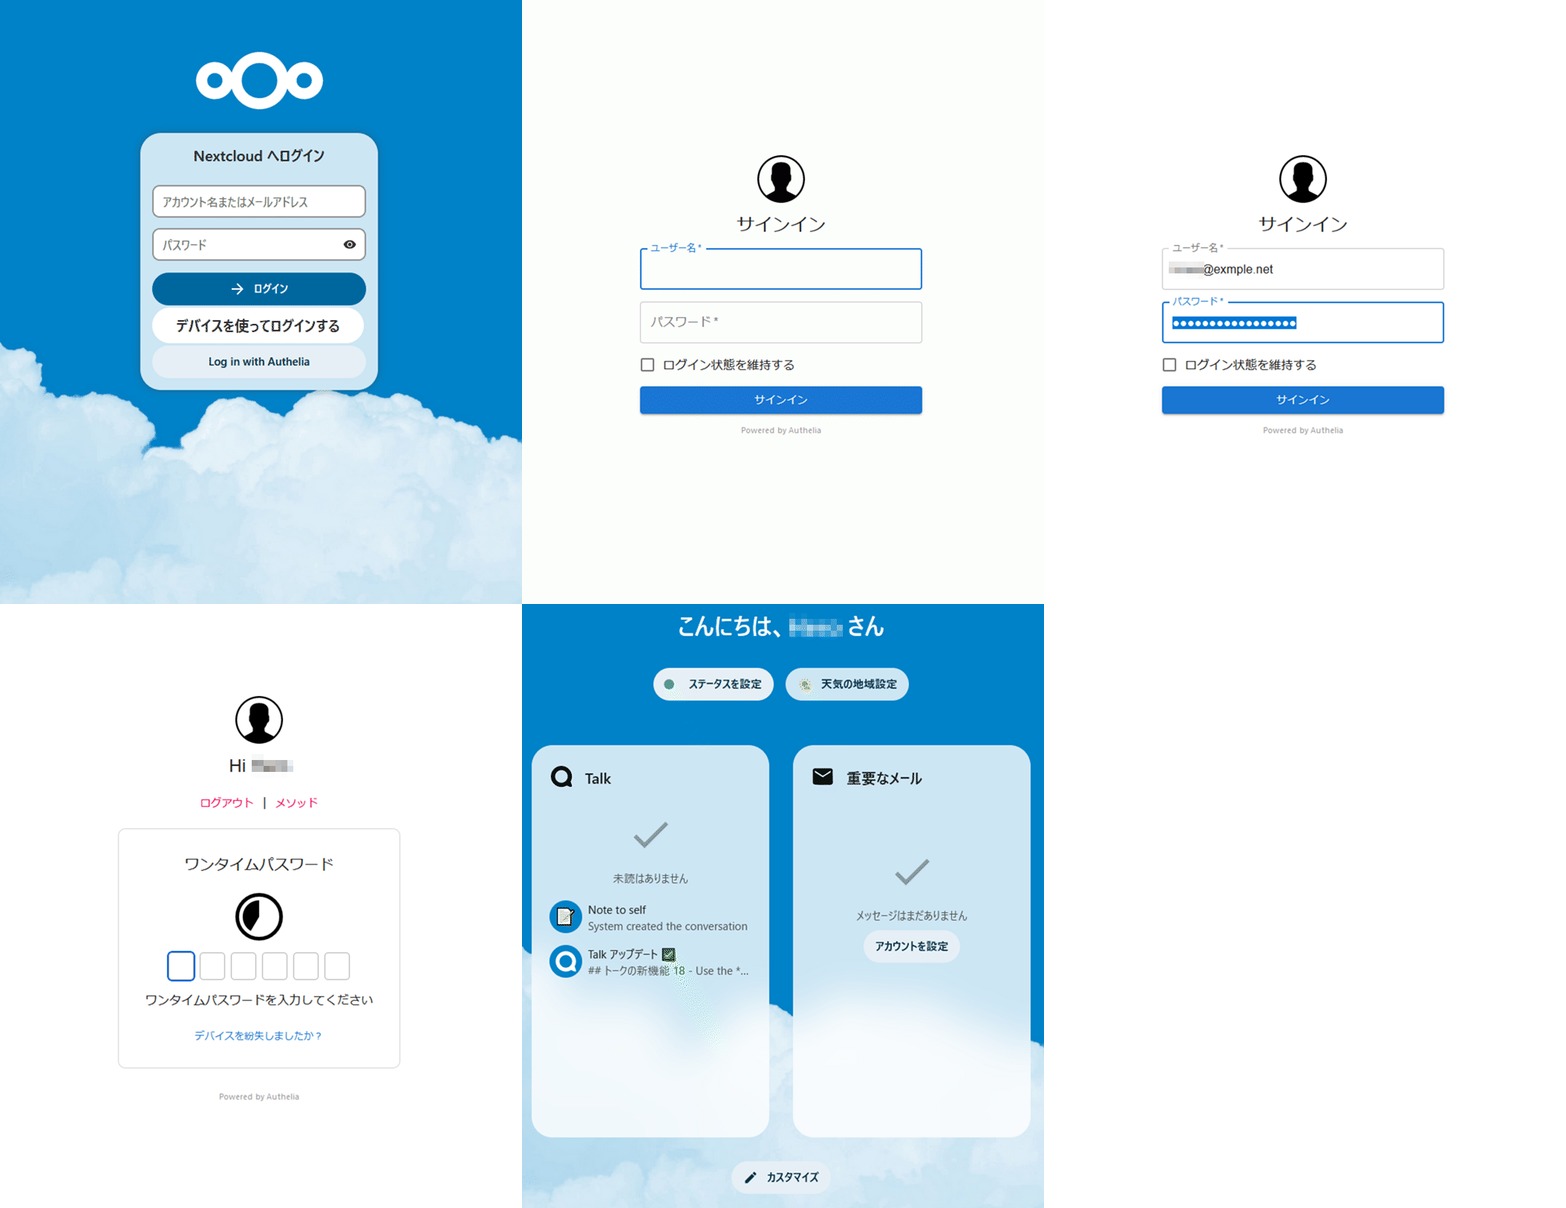
リバースプロキシ型の認証システムだがベータ機能としてOpenID Connect(OAuth2)の認証サーバーも兼ねることができるOSS。
Authentik、KeycloakやOpenAM等多機能で無料で使えるOSSは数多くありますが、エンタープライズ級に多機能かつ複雑なものが多いので、認証だけに特化したAutheliaを自宅認証基盤とします。
認証バックエンドとしてローカルのファイル又はActive Directory含むLDAPサーバを使用可能で、データベースはSQLiteかMySQL、postgresqlが使えます。
docker-compose.yml
当該部分だけです。
  caddy: ←認証サーバーのフロントエンド
      networks:
      default:
        aliases:
          - auth.example.net ←OIDCとして使う場合はDocker内部で認証サーバーのhttpsに対して接続できるようにする必要がある
  authelia:
    image: authelia/authelia
    restart: always
    container_name: authelia
    volumes:
      - ./authelia:/config
    expose:
      - 9091
    healthcheck:
      disable: true
    environment:
      - TZ=Asia/Tokyo
      - PUID=1000
      - PGID=100
./authelia/configuration.yml
以下はActive DirectoryをバックエンドにしつつOIDCとして使うために最低限必要な内容を網羅しています。(秘密鍵は当然除去済みなので適宜生成するように。)
書き上げてチェックするのにきっかり24時間かかった🫠
- configuration.yml
---
theme: light
jwt_secret: uuidgenコマンドで出た文字列を2回分くらいつないだやつを入れる
default_2fa_method: ""
server:
  host: 0.0.0.0
  port: 9091
  path: ""
  enable_pprof: false
  enable_expvars: false
  disable_healthcheck: false
  tls:
    key: ""
    certificate: ""
    client_certificates: []
  headers:
    csp_template: ""
log:
  level: debug
  format: text
  file_path: /config/authelia.log
telemetry:
  metrics:
    enabled: false
    address: tcp://0.0.0.0:9959
totp:
  disable: false
  issuer: example.net
  algorithm: sha1
  digits: 6
  period: 30
  skew: 1
  secret_size: 32
webauthn:
  disable: false
  timeout: 60s
  display_name: Example.net Atuh Server
  attestation_conveyance_preference: indirect
  user_verification: preferred
ntp:
  address: time.cloudflare.com:123
  version: 4
  max_desync: 3s
  disable_startup_check: false
  disable_failure: false
authentication_backend:
  password_reset:
    disable: true
    custom_url: ""
  refresh_interval: 5m
  ldap:
    implementation: activedirectory
    url: ldaps://192.168.100.200
    tls:
      skip_verify: true
    base_dn: dc=example,dc=net
    user: CN=binduser,CN=Users,dc=example,dc=net
    password: くそしてねろ
password_policy:
  standard:
    enabled: false
    min_length: 8
    max_length: 0
    require_uppercase: true
    require_lowercase: true
    require_number: true
    require_special: true
  zxcvbn:
    enabled: false
    min_score: 3
access_control:
  default_policy: two_factor
session:
  name: authelia_session
  domain: example.net
  same_site: lax
  secret: insecure_session_secret
  expiration: 1h
  inactivity: 5m
  remember_me_duration: 1M
regulation:
  max_retries: 3
  find_time: 2m
  ban_time: 5m
storage:
  encryption_key: uuidgenコマンドで出た文字列を3回分くらいつないだやつを入れる
  local:
    path: /config/db.sqlite3
notifier:
  disable_startup_check: false
  filesystem:
    filename: /config/notification.txt
identity_providers:
  oidc:
    issuer_private_key: |
      -----BEGIN PRIVATE KEY-----
      丶丶丶丶丶丶温幽籬櫑櫑櫑櫑櫑幽厶雌櫑幽岱垉厶丶丶丶丶丶丶
      丶丶丶当櫑欟欟櫑欟欟欟欟欟欟欟櫑欟櫑櫑翻麗謝叱丶丶丶丶丶
      丶丶丶覇竃櫑櫑欟欟欟欟欟欟欟櫑欟櫑欟欟欟層櫑艶旨丶丶丶丶
      丶丶丶層櫑欟欟欟欟欟欟欟欟欟嬲竃嬲竃竃欟櫑竃覇覇丶丶丶丶
      丶丶丶灑嬲欟欟嬲嬲嬲嬲嬲鬻辧卻眉贈幗層欟欟櫑竃櫑廴丶丶丶
      丶勹僧層櫑欟鬱綴綴局悦局局拇狐綴綴鋼幗幗竃欟竃櫑廬丶丶丶
      丶湘嬲嬲櫑欟辧綴仰災欠災沼卻局綴綴掴綱幗櫑嬲幗櫑廳丶丶丶
      丶勺覇欟櫑鬱即卻仰災災沿己卻凹句郊塀獅幗櫑櫑欟櫑勳丶丶丶
      丶丶濁幗欟圓扼卻仰災災沱災可沼笳鏑櫑雌彌幗櫑欟櫑欟眦丶丶
      丶丶層櫑櫑鬱狐猖旛幽迫己旧卻獅嬲嬲幗幗幗幗櫑欟櫑覇眇丶丶
      丶丶櫑欟欟鬱掴嚴憫笥局仰可局綮当踏審綱燒幗層欟櫑欟廴丶丶
      丶丶層覇櫑欟即尚旛籬籬枢叫猖鬱幣憫牒憫椹禰幗欟欟欟杉丶丶
      丶丶層欟櫑欟抓儕凹沼珱卻旧塀簡紹笳綴僻綴掴幗欟欟鬱丶丶丶
      丶丶丶層櫑欟仰卻旧突句己沒笵綴囹卻仰加仰塀禰層欟欟企丶丶
      丶丶丶瀰欟欟仰旧句災沼卻卻卻獅雌扼卻卻狐綴綱層欟欟歡丶丶
      丶丶丶湧欟欟紀凹句巡卻仰似局綴獅雌卻卻綴掴綱幗嬲覇黙丶丶
      丶丶丶丶層眼眼句旧卻卻鍵輔禰層嬲幗囹卻綴掴囃幗櫑歉丶丶丶
      丶丶丶丶勺龝圄句沒卻卻卻卻沺禰幗幗雌歳狐掴囃彌欟默丶丶丶
      丶丶丶丶丶丶丶句沒卻笳僻把洞雄櫺櫑顧綴鋼囃讃幗嚶丶丶丶丶
      丶丶丶丶丶丶丶勺句卻譲嬲霸嫻嬲幗難掴獅幗幗幗嬲艶二丶丶丶
      丶丶丶丶丶丶丶丶句旧卻卻綴掴燒辧辧讃幗幗幗幗杉欟欟幽丶丶
      丶丶丶丶丶丶丶丶丶刈皿狐卻仰瀉囃雌幗幗幗覇歉勺欟欟欟櫑幽
      丶丶丶丶丶丶丶丶丶丶勺牋綴燒雌幗幗幗幗幗鬱三儲欟欟欟櫑櫑
      丶丶丶丶丶丶丶丶二旛櫑封贈簡幗難幗幗櫑鬱災三灑欟欟欟櫑欟
      丶丶丶丶丶丶澁櫑櫑櫑櫑歡兆卻塀綱幗幗黙冖三消欟欟欟欟欟覇
      丶丶丶澁籬櫑櫑櫑櫑櫑櫑置丶筍綴綴諜冖丶丶三瀰欟欟欟欟欟覇
      丶誕櫑櫑櫑櫑櫑櫑櫑欟櫑置丶勺朔薪丶丶丶丶勺欟欟欟欟欟櫑櫑
      灑櫑櫑櫑櫑櫑櫑櫑櫑欟欟置丶俎幗雛止丶丶丶儲欟欟欟欟欟櫑櫑
      欟櫑櫑櫑櫑櫑櫑櫑櫑櫑欟置丶欟攜層櫑幽丶丶灑欟欟欟欟欟櫑櫑
      -----END PRIVATE KEY-----
    access_token_lifespan: 30m
    authorize_code_lifespan: 1m
    id_token_lifespan: 30m
    refresh_token_lifespan: 90m
    enable_client_debug_messages: false
    enforce_pkce: public_clients_only
    cors:
      endpoints:
        - authorization
        - token
        - revocation
        - introspection
        - userinfo
      allowed_origins:
        - https://auth.example.net
      allowed_origins_from_client_redirect_uris: true
    clients:
      - id: komga
        description: Komga
        secret: ちゃんと公式ドキュメントを読んで生成しろよ(https://www.authelia.com/integration/openid-connect/frequently-asked-questions/#how-do-i-generate-client-secrets)
        public: false
        authorization_policy: two_factor
        redirect_uris:
          - https://books.example.net/login/oauth2/code/authelia
        scopes:
          - openid
          - profile
          - email
        grant_types:
          - authorization_code
        userinfo_signing_algorithm: none
      - id: headscale
        description: Headscale
        secret: (・∀・)イジョウジサクジエンデシタ
        public: false
        authorization_policy: two_factor
        redirect_uris:
          - https://ts.example.net:443/oidc/callback ←Headscaleの設定に合わせて:443を付けないとこけます
        scopes:
          - openid
          - profile
          - email
        grant_types:
          - authorization_code
        userinfo_signing_algorithm: none
コマンドメモ
Digestをautheliaのconfigに書き、Random PasswordをOauthする側に設定する
user@photon-machine [ ~/docker/container ]$ docker-compose run authelia authelia crypto hash generate pbkdf2 --variant sha512 --random --random.length
 72 --random.charset rfc3986
Random Password: 1EmWSMJZs1DhXs3RぬるぽR1gJNFrUi7Wv4mBrbZtvlWaK15thnEv2dznfNizsYF90SA
Digest: $pbkdf2-sha512$310000$wRy8rDKN1VM5Wガッog$S62QcY1GGTz2LodLNDIZDZi/DU4D1WChxcM8vWXXE93NhVlec6LUdmZZAL10/j.hXJbnw8fH8OvYV6c5eVk1YA
m
OIDCの構成URLと仕様
大体ログインページ(https://auth.example.com/)を指定すれば勝手に下記を引いて通るが手動で設定するよう求められた場合やなんかうまくいかない時に確認する
user@photon-machine [ ~/docker/container ]$ curl https://auth.example.net/.well-known/openid-configuration | python -m json.tool
{
    "issuer": "https://auth.example.net",
    "jwks_uri": "https://auth.example.net/jwks.json",
    "authorization_endpoint": "https://auth.example.net/api/oidc/authorization",
    "token_endpoint": "https://auth.example.net/api/oidc/token",
    "subject_types_supported": [
        "public"
    ],
    "response_types_supported": [
        "code",
        "token",
        "id_token",
        "code token",
        "code id_token",
        "token id_token",
        "code token id_token",
        "none"
    ],
    "response_modes_supported": [
        "form_post",
        "query",
        "fragment"
    ],
    "scopes_supported": [
        "offline_access",
        "openid",
        "profile",
        "groups",
        "email"
    ],
    "claims_supported": [
        "amr",
        "aud",
        "azp",
        "client_id",
        "exp",
        "iat",
        "iss",
        "jti",
        "rat",
        "sub",
        "auth_time",
        "nonce",
        "email",
        "email_verified",
        "alt_emails",
        "groups",
        "preferred_username",
        "name"
    ],
    "introspection_endpoint": "https://auth.example.net/api/oidc/introspection",
    "revocation_endpoint": "https://auth.example.net/api/oidc/revocation",
    "code_challenge_methods_supported": [
        "S256"
    ],
    "require_pushed_authorization_requests": false,
    "userinfo_endpoint": "https://auth.example.net/api/oidc/userinfo",
    "id_token_signing_alg_values_supported": [
        "RS256"
    ],
    "userinfo_signing_alg_values_supported": [
        "none",
        "RS256"
    ],
    "request_object_signing_alg_values_supported": [
        "none",
        "RS256"
    ],
    "request_uri_parameter_supported": false,
    "require_request_uri_registration": false,
    "claims_parameter_supported": false,
    "frontchannel_logout_supported": false,
    "frontchannel_logout_session_supported": false,
    "backchannel_logout_supported": false,
    "backchannel_logout_session_supported": false
}
Headscale
iOSのTailscaleアプリがサーバーの変更に対応したので本家TailscaleからHeadscaleに移行する。お目溢しで多数のデバイス登録させてもらってるのも申し訳なくて
下記の設定でAndroidのTailscaleアプリからAutheliaで認証することができるのは確認した。
docker-compose.yaml
  headscale:
    container_name: headscale
    image: headscale/headscale:0.22.0
    volumes:
      - ./headscale/config:/etc/headscale/
    expose:
      - 8080
    ports:
      # metrics test /metrics
      - 9090:9090
    command: headscale serve
    restart: unless-stopped
./headscale/config.yaml
- subnet経由で外から自宅サーバーの経由の名前を引いてアクセスするための設定も込みです
- /varに書き込めないので動的に作成されるファイルの場所を/etc/headscale/(ボリューム)に変更しています。
- config.yaml
---
server_url: https://hs.example.net:443
listen_addr: 0.0.0.0:8080
metrics_listen_addr: 0.0.0.0:9090
grpc_listen_addr: 127.0.0.1:50443
grpc_allow_insecure: false
private_key_path: /etc/headscale/private.key
noise:
  private_key_path: /etc/headscale/noise_private.key
ip_prefixes:
  - fd7a:115c:a1e0::/48
  - 100.64.0.0/10
derp:
  server:
    enabled: false
    region_id: 999
    region_code: headscale
    region_name: Headscale Embedded DERP
    stun_listen_addr: 0.0.0.0:3478
    private_key_path: /etc/headscale/derp_server_private.key
  urls:
    - https://controlplane.tailscale.com/derpmap/default
  paths: []
  auto_update_enabled: true
  update_frequency: 24h
disable_check_updates: false
ephemeral_node_inactivity_timeout: 30m
node_update_check_interval: 10s
db_type: sqlite3
db_path: /etc/headscale/db.sqlite
acme_url: https://acme-v02.api.letsencrypt.org/directory
acme_email: ""
tls_letsencrypt_hostname: ""
tls_letsencrypt_cache_dir: /var/lib/headscale/cache
tls_letsencrypt_challenge_type: HTTP-01
tls_letsencrypt_listen: :http
tls_cert_path: ""
tls_key_path: ""
log:
  format: text
  level: info
acl_policy_path: ""
dns_config:
  override_local_dns: true
  nameservers:
    - 192.168.100.211
    - 192.168.100.212
  domains: []
  magic_dns: true
  base_domain: example.com
unix_socket: /tmp/headscale.sock
unix_socket_permission: "0770"
oidc:
  only_start_if_oidc_is_available: true
  issuer: https://auth.example.net ←最後の/をなしにしないと通らない
  client_id: headscale
  client_secret: ピュー (  ^^ ) <これからも山崎を応援して下さいね(^^)。
  scope:
    - openid
    - profile
    - email
logtail:
  enabled: false
randomize_client_port: false
コマンドメモ
ユーザー一覧表示
docker-compose exec headscale headscale users list
ノード一覧表示
docker-compose exec headscale headscale nodes lis
ルート一覧表示
docker-compose exec headscale headscale routes list
ルートを承認
docker-compose exec headscale headscale routes enable -r 1
外部とブリッジされたネットワークを作成する(現行)
AdGuard等多数のポートを開放するコンテナに実ネットワークのIPアドレスを割り当てるために行う設定。
このままではホスト↔コンテナの通信がkernelで遮断されるがこれは仕様。
ホストに別途macvlanデバイスを作成し、そちらにIPアドレスを割り当てるとでこの制限を回避できるが、Dockerと関係がないので別の記事
引数の–gateway は作成したデフォルトゲートウェイのアドレスを指定する。bridgeと異なるので注意
docker network create -d macvlan \
 --subnet=192.168.100.0/24 \
 --gateway=192.168.100.1 \
 -o parent=eth0 \
 external-network
外部とブリッジされたネットワークを作成する(旧)
この方法をやると、不具合が発生することが判明したので上の段落のmacvlanドライバに順次切り替える。
- –ports 指定が効かず、他のホストからアクセスできない
- docker-composeて自動的に作られるネットワークが勝手に隔離扱いになって実ネットワークに繋いていないコンテナから外に出られない。(セキュリティ的に望ましい動作たが、リバースプロキシの裏に他所と通信するフロントエンドがいるので困る)
元ネタ Qiita 外部ネットワーク側からDockerコンテナに通信できる環境を作成する
自分で事前に作成したブリッジに接続するように指定する。
docker-compose等で作成したネットワークにコンテナをつないであげれば外からコンテナに直接アクセスできるようになる。
引数の–gateway は作成したブリッジのアドレスを指定する。ルーターのアドレスなどを指定するとブリッジが壊れて締め出される羽目になる。
もしそうなったらコンソールから docker network rm external-network で消してから再生成して再起動する。
docker network create \
  --driver=bridge \
  --subnet 192.168.100.0/24 \
  --gateway 192.168.100.223 \
  --opt "com.docker.network.bridge.name"="br0" \
  external-network
